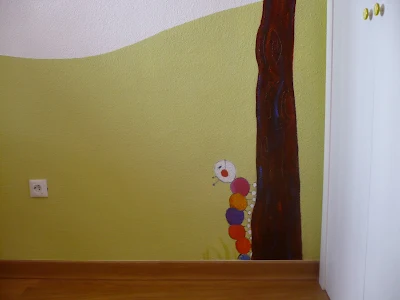
Habitación de Blanca
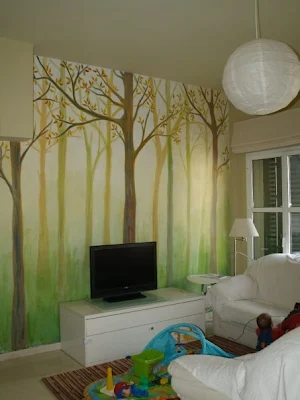
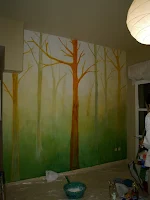
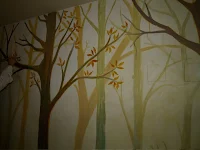
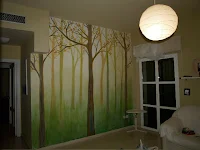
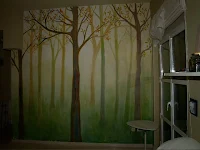
Mi último mural, recién salido del horno.
Aún necesita un par de pinceladas, cuando los papás de Blanca terminen de amueblar la habitación. Creo que aclararía un poco el árbol de la ventana, que aunque está a juego con la carpintería, resulta un tanto triste.
My last Mural project. Just out from the oven. Still needs a couple of strokes, once Blanca's parent finish furnishing the room. I think I will make the tree by the window a bit brighter, even when it matches the wood-work in the room it looks a bit sad.
Un bosque en casa
Este es el último mural que he hecho para una familia que quería tener " el bosque en casa" y creo que lo conseguimos ;P.
Vieron el boceto del bosque que quedó huérfano y lo adaptamos para ellos. Aquí podeis ver el paso a paso.
This is the last mural painting i've done , for a family who wanted to have " the wood at home" and I think we did it ;P
They saw time ago the preparatory watercolor of a wood that became homeless and we adapted it to their needs. Here you can see the step by step process.
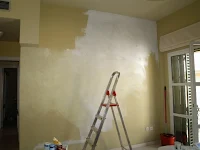
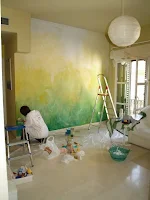
Primero, si la pared no está en perfecto estado "de revista" hay que limpiar y "corregir" la pared, es decir, tapar agujeros de taladro, grietas etc y si , como en este caso, hay un color inicial más oscuro de lo que queremos, hay que dar una mano o dos de blanco y dejar secar
First, if the wall is not exactly perfect, a bit of cleanning is needed as well as"correcting" (get rid of holes or litle cracks etc ) and if, like here, the shade we have is darker than we need, we'll need a layer or two of white paint and enough drying before we can start painting
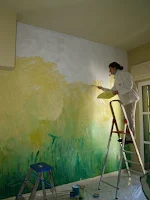
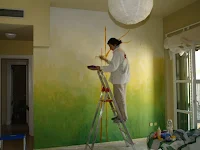
Después se hace una base sobre la que pintar. En este caso es un bosque, y queríamos darle profundidad y crear un poco de "atmósfera" ya que el salón donde se realizó no es muy grande. Para ello vas cubriendo a brochazos irregulares la pared con los tonos adecuados y luego se unifica todo un poco como si "desenfocáras" el dibujo difuminando con esponja o una brocha grande
After that, as it will be a forrest, we need to paint a base to create the ilusion of depth and a misty atmosphere, also needed because the living room was not too big. For that I covered the wall with irregular brushstrokes and difernt shades of green and yellow and then blurred all a bit using a spounge or a dry broad brush
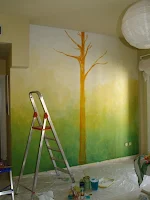
después van creciendo los árboles. Primero usa un tono claro para así poder corregir errores más facilmente, oscurecer lo que te interese que quede en primer plano o añadir texturas etc.. y no hagas muchos detalles ahora
Now, the trees are growing. First use a pale shade so you can correct errors easier, darken what you want to be close-up , add texture etc.. Don't paint too much details now
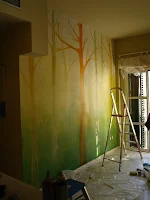
Por último añade las texturas (el tronco central lleva hasta papel de periódico) y añade los detalles como las hojas o las estrías del tronco.
Finally add texture (the central tree has glued newspaper bits) and details like the leaves or the lines of the trunk
Si quieres un mural como este en tu casa o negocio, ponte en contacto conmigo através del blog
If you live on my area and fancy one of my murals at home or your business, write me through this blog
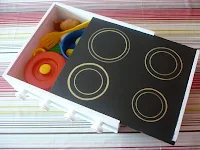
cocinita portátil
Si estas navidades alguien te regala una caja de vino, no la tires... tarde o temprano se te ocurrirá algún uso que darle... Hasta ahora, las que había en casa han sido pedestal para la pantalla del pc, caja de herramientas, cubertero improvisado... pero se me ocurren muchas otras que no siempre tengo tiempo de realizar como estanterías, lámparas de pared, casitas de muñecas...
El últino "proyecto caja de vinos" quehe realizado han sido cocinitas portátiles, superfáciles de hacer...
If you happen to get a box of wine this Christmas, don't throw it away... sooner or later you'll find a use for it... Til now, the ones at home have been a PC screen stand, tool box, improvised cutlery organizer... but i can think on may others that I don't always have time to make, like shelves, wall lamps, doll houses...
My last "Wine box project" has been a couple of portable toy kitchens, deadly easy to make...
sólo necesitas 1 caja de vinos, un tirador alargado y 4 pomos de cocina, papel de lija, pintura,pegamento extrafuerte, un rotulador blanco, plata o dorado y buen humor ;P
Si te decides a hacerla, me encantaría que enviases una foto de tu cocinita, para enseñarla aquí ( Y por pura curiosidad, jeje, seguro que se os ocurren mejoras e innovaciones y que vuestro estilo es muy variado). ¡Gracias!
Aquí lo teneis:
1. Retira el asa de la caja y cuida que no haya puntillas ni grapas sueltas o que sobresalgan. Lija bien la caja y la tapa por dentro y por fuera (se supone que es para niños pequeños)
2. Haz 4 agujeros con el taladro en uno de los laterales largos para introducir los pomos. Hazlos un pelín más anchos que los tornillos de los pomos para que estos puedan girar facilmente.
3. Pinta la caja del color deseado y la tapa negra. Cuando se seque ésta, dibuja 4 circulos de distinto tamaño en un color que resalte con el negro para hacer los fogones.
4.Introduce los pomos y, antes de atornillarlos, pon un poco de pegamento al final de los tornillos para que la rosca quede bien pegada y éstos no se salgan por mucho que se giren los pomos al jugar
5. Pega o atornilla el tirador de cocina en el lateral de la caja al que quitaste el cordón (asa original) de la caja teniendo cuidado de tapar los agujeros que quedaron
6. rellena con los utensilios de cocina y .... ¡A jugar!
You only need a box of wine, a large kitchen furniture handle, 4 door knobs, sandpaper, acrylic paint, strong glue, a white, silver or golden felt-tip pen and good humor ;P
-If you decide to make one of them, I'll appreciate if you send me a photograph. It will be fun to create a gallery with them. (I must admit i'm very curious about what you come up with... surely you imagine new improovements and innovations and your styles may be very different) Thanks!-
Here it goes:
1. Remove the cord handle from the box and be careful there are no nails or staples pointing out. Sand down thoroughly all around the box and inside (it is supposed to be a toy for little children)
2. Drill 4 holes to one of the longer side of the box so you can introduce the knobs through them. Make them slightly bigger than their screws so knobs can turn easily.
3. Paint the box with the desired shade and the lid in black. Once this one is dry, draw 4 diferent size circles with the felt-tip pen you choose so you get the burners
4. Introduce the knobs throug their holes and, before screwing them put a bit of strong glue on the screw tip so the thread stays fixed and knobs don't come off no matter how much the kid turn them for cooking
5. paste or screw the kitchen handle to the side of the box wich once had the original cord handle being careful to cover with it the original holes left by the cord
6. Fill with kitchen stuff and ¡Let's play!
F de Ferdinand
Este verano hice dos camisetas más para mi sobrino, una sacada del libro del genial Janosh "Das Auto hier heist Ferdinand" muy querido por su padre (y media Alemania) y la otra con la F de Ferdinand y no las había enseñado hasta ahora (qué despiste...)
Last summer I did two more t-shirts for my nephew that I havn't post till now (this head of mine...), one from the book "Das Auto hier heist Ferdinand" from the terrific Janosh, beloved by his father (and half Germany) and another with the F from Ferdinand
el árbol de Pablo cambia...
Después de construir el armario en el cuarto de Pablo y Anna, hubo que "arreglar" el árbol, cuyo tronco se había "agobiado" (según Pablo... ¿?) y además, pintamos un buho y "muchas hojitas" así que finalmente el aspecto del árbol ha cambiado un poco y ahora Pablo vuelve a estar contento :D
After building a wardrobe in Anna & Pablo's room, i had to "repair" the tree, which trunk was "overwhelmed" (so said Pablo in translated spanish... ¿?) and also i painted an owl and "lots of green little leaves" so after all the look of the tree has changed a bit and now Pablo is happy again with it :D
intercambio con Raquel 2
Ya puedo colgar las fotos del "intercambio artístico" que hice con Raquel de el cocherito leré. Por fin llegó mi paquetito y puedo enseñaros las camisetas que pinté para sus sobrinas a cambio de los zapatitos y las sandalias tan monas que ella mandó. Me ha encantado hacer este intercambio sorpresa. Es la primera vez, pero es emocionante, quien sabe, quizás no sea la última :D
....y parece que a las sobrinillas les ha gustado ;P
¡Genial!
Now I can post pics of the "arty exchange" i did days ago with Raquel from el cocherito leré.
At last my little parcel arrived to it's destination and I can show you the t-shirts I illustrated for her nephews in exchange for her sweet litle shoes. Making all this has been very nice, I like the idea. It's the first time, but it's been thrilling, who knows... it may not be the last :D
.... and It looks like her nephews enjoy them ;P
Brilliant!
mini tutorial de Lolilla
1) Coser el cuerpo a la cabeza dejando un hueco en la parte trasera del cuello (yo lo he hecho en el cuello, pero puede ser complicado para darle la vuelta si haceis el cuello estrecho, así que también podeis utilizar la parte superior del pelo o posteriormente, una esquinita de la falda, por ejemplo) y abierto el bajo y los laterales para poder coser el resto de piezas y rellenar brazos y piernas. Foto 1
2) poner brazos y piernas del derecho y ya rellenos dentro de la "bolsita" formada por el cuerpo y la cabeza ya unidos (foto 3-4) en la posición que se indica en la foto 2 pero con el cuerpo y la cabeza del revés.
3) coser todo el contorno del cuerpo con brazos y piernas en su posición, con ayuda de alfileritos.Yo lo he hecho a mano, pero se puede hacer tb a máquina, si tenéis.
4) Finalmente, sacamos los pies y las manos con cuidado y paciencia por la abertura que dejamos anteriormente y así vamos dandole la vuelta a la muñeca. Espero haberme explicado bien. ¡Que os divirtais!
1) Sew body and head together leaving an openning on the back side of the neck (I did it this way, but later was a bit delicate to turn the doll outside, so you could leave your openning at the top of the head or better still at the corner of the skirt) and you need to leave also still open the bottom and one side of the body to be able to sew legs and arms on the right place. Pic 1
2) Place legs and arms already turned out and filled inside the "bag" formed by the body and head already sewn together as you can see on pic 2. Body and head must still be outside in. See pics 3-4
3) sew all along the body with legs and arms on it's right possition, you may need the help of some pins. I've done it by hand, but you can do it with the machine if you have one. Pic 4
4) Through the openning we left at the beginning we proceed to pull out legs and arms to, carefully and patienly turn the doll outside out.
Hope I've explained all clearly enough with this rusty English of mine...Have fun!
Lolilla
Por fín terminé la muñeca de Lola.
En realidad hace ya algún tiempo, pero no he encontrado un buen momento hasta ahora para colgar las fotos. A Yago le gustó mucho poder jugar con ella...
Hice un pequeño tutorial de cómo montar la muñeca una vez terminadas todas las piezas.... algún día encontraré la tranquilidad necesaria para montarlo y publicarlo en condiciones :P Aún no me salen simétricas, pero creo que eso les da su encanto. La cara está bordada.
Finally I finished Lola's doll. Well, I did it some weeks ago, but I didn't find the right time to sit down at my desk
and hung it up the pics til now. Yago was very pleased to play with her for a while...
I shooted up a little photo tutorial to show how to build the doll together... Some day I'll find peace enough to hung it up :P They are still not simetrical, but I think that adds a charming touch. The face is embroidered.
Intercambio sorpresa con Raquel
Uno de los blogs que visito asiduamente es el cocherito leré. Hace poco vi las sandalias tan bonitas que hizo Raquel para Artistas con Corazón y le pregunté si las vendía. Como no las vende (una pena) pero le gustan mis camisetas, nos propusimos un "intercambio sorpresa" sus zapatillas de croché por mis camisetas, y desde entonces, no he hecho más que esperar al cartero... ¡Y por fín han llegado!! son preciosas y Anna va a estar seguro para comérsela con ellas :D ¡Gracias Raquel! ahora sólo tengo que encontrar un hueco para terminar las camisetas y mandarlas, que seguro que ella está ya esperándolas con mucha curiosidad ;P
One of the blogs I visit frequently is el cocherito leré. Soon ago I saw the cute sandals Raquel did for Artistas con Corazón and I asked her wether she sell her stuff. She doesn't (A real pity) but I found out she like my t-shirts, so we arranged to make an "surprise exchange", her cute little shoes for my t-shirts, and since, I havn't done more than waiting for the postman... And finally they are here!! They are beautiful and Anna will surely the cutest with them :D Thanks Raquel! Now I just need some time to finish my t-shirts and send them to her, who is surely waiting them already full of curiosity ;P
... el paquetito... ¡Qué nervios! .... the parcel... I'm nervous!
¡Me encantan!! las sandalias quedarán genial con los pantalones de lunares... o el vestidito rojo...
I love them!! Sandals will go smooth with polka dot trousers... or the little red dress...
Me la como...en fin, me pongo un pelín cursi con esto, pero es que me encanta :D
Isn't she cute?.... anyway, I tend to be a bit "pinky" about this, but I love it :D
Yago y Anna
¡Hola de nuevo!
Anna ya tiene tres meses y poco a poco voy reorganizándome para volver a crear y postear... espero poder hacerlo más a menudo, aunque las vacaciones están por medio y será complicado, ya veremos lo que se puede hacer...
Yago es el primer muñeco de trapo que hago. En principio lo hice pensando en mi hijo Pablo, al que le gustan los monstruos... pero Anna es la que de verdad lo disfruta. Le gusta tanto que me animé a hacer más. En cuanto tenga fotos os las presentaré ya que están repartidas por ahí, con las amiguitas de Anna. Es mejorable, pero creo que no me ha salido mal para ser el primero.
Me encantaron las muñecas que Rosa Pomar enseña en su Blog y me puse a buscar otros ejemplos en otros blogs de artesanas y apañás y esto es lo que salió. Gracias a todas. Me encantan los muñecos de Herzensart (los viquingos son geniales) y los "beluñecos" de Belula me han servido de inspiración para calentar motores...
Hello again!
Anna is already three months old and slowly, i'm rearranging my time to be able to create and post again... I hope I can do it more often, although hollidays are on the way and it will be difficult...let's see
Yago is the first fabric doll i make. It came thinking on my son Pablo, who like monsters... but Anna is who really enjoys it. She likes it so much that i thought of making more. As soon as I have pics of them i'll introduce them to you, as they are allready away, amusing friends of little Anna. I know it can be improoved, but I think is not bad at all for being the first one!
I love the dolls Rosa Pomar shows on her blog and I begun to have a look to other crafters' blogs and that's what came up. Thank you all. I love the ones from Herzensart (particularly the vikings are terrific) and the "beluñecos" from Belula have been my inspiration to warm up the machine...
Cerrado por maternidad :D
El Jueves 16 de Abril, a las 17:30h nació Anna. 3.830 gr, 51cm, tranquila y comilona.
Traerla al mundo costó un poco, pero finalmente, y tras mi segunda cesárea, lo conseguimos. Las dos estamos bien y nos estamos conociendo poco a poco, así que como comprenderéis, estaré un tiempo sin postear demasiado, al menos, hasta que cojamos ritmillo :D
On Thursday April the 16th, around 17:30h Anna was born. 3.830gr, 51cm, quiet and greedy.
Bringing her to this world was a bit hard, but finally, and after my second caesarean, we did it. We both are ok and are slowly getting to know each other, so, as you may understand, I'll be some time away from posting, at least, till we get some rythm :D
Suscribirse a:
Entradas (Atom)